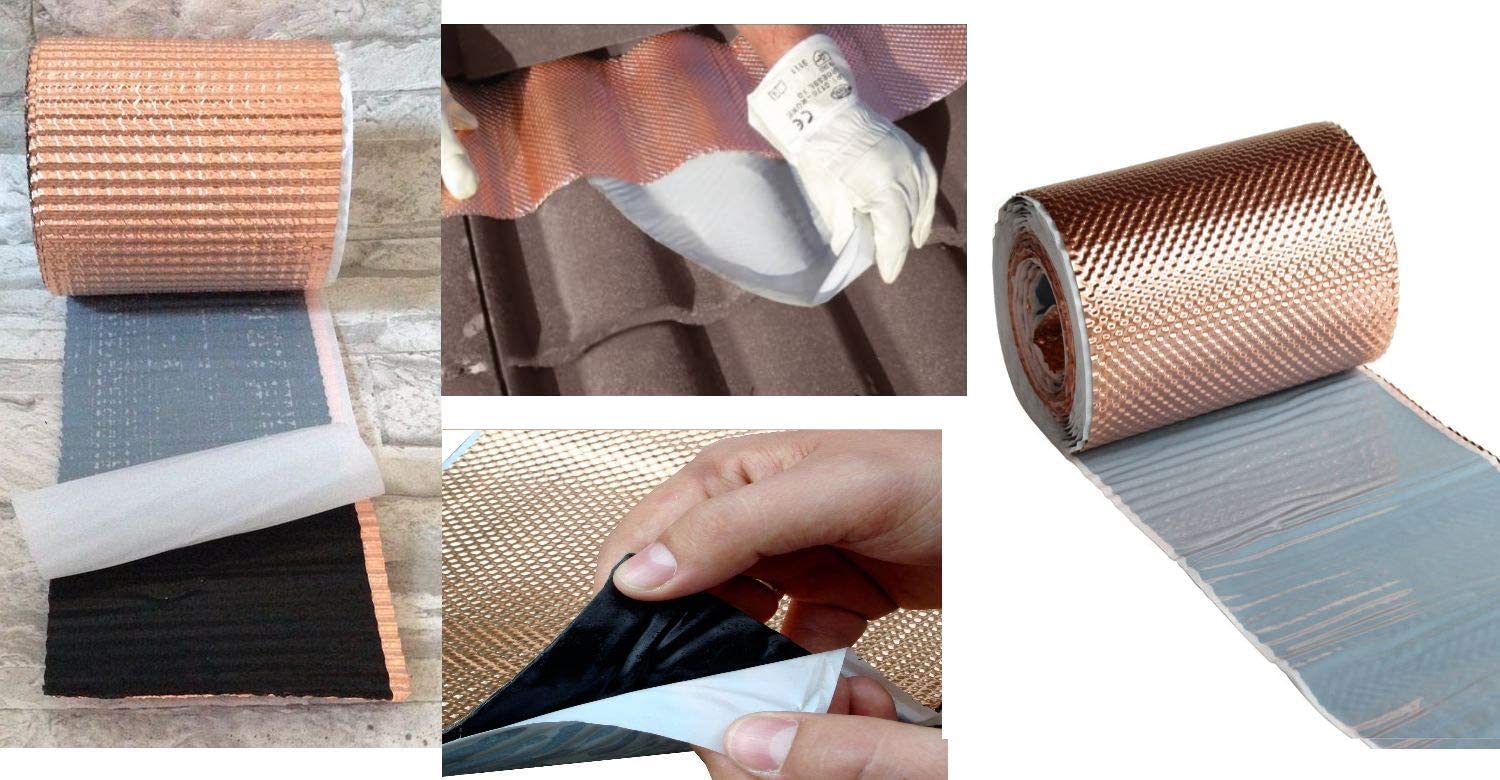
Anti-moss copper tape offers you a powerful, eco-friendly defense against roof damage. When installed below your roof’s ridge line, the tape naturally releases copper ions that prevent moss growth and protect your roofing materials. You won’t need harsh chemicals or frequent maintenance, as the copper’s self-regenerating process provides decades of continuous protection. The simple installation process requires just a clean, dry surface and proper weather conditions. Discover how this natural solution can safeguard your roof’s structural integrity.
Understanding the Moss Problem: Why Your Roof Is at Risk
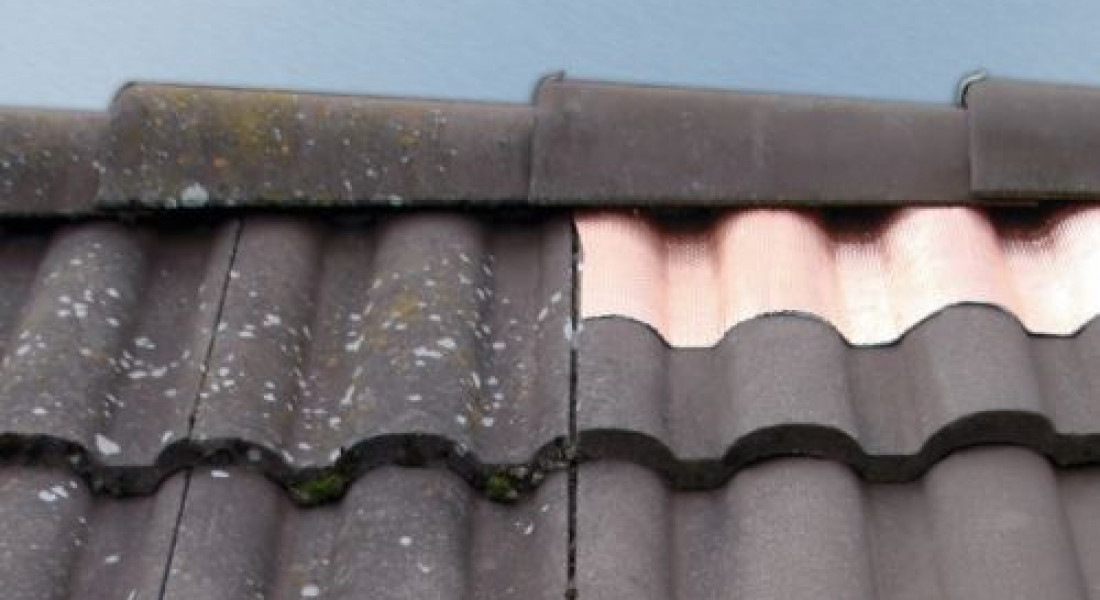
While many homeowners overlook moss growth as a minor cosmetic issue, it poses a serious threat to your roof’s structural integrity. The problem begins when moss attaches to your roofing materials, creating a moisture-trapping environment that accelerates deterioration.
Your roof becomes particularly vulnerable during freeze-thaw cycles, as moss retains water that expands and contracts, leading to microscopic cracks in tiles and shingles. Left unchecked, these small fissures develop into significant roof damage, compromising your home’s weatherproofing system.
Additionally, moss growth creates channels that redirect water flow, preventing proper drainage and causing water to pool in areas it shouldn’t. This trapped moisture can penetrate deeper into your roofing structure, potentially leading to rot in wooden components and weakened structural supports.
How Anti-Moss Copper Tape Works: The Science Behind It
To combat these destructive moss issues, copper tape offers a scientifically proven defense mechanism. When exposed to the elements, the copper undergoes a natural oxidation process, releasing Cu²⁺ ions that are toxic to moss and algae.
As rain flows down your roof, it carries these protective ions across the surface, creating an invisible shield against unwanted growth.
This eco-friendly solution works continuously through a self-regenerating process. The copper forms a protective patina layer composed of copper carbonate and sulfate compounds, which gradually erode at different rates depending on your environment.
In urban areas, the erosion rate is about 0.8 µm yearly, while industrial zones experience around 2.0 µm annually. This controlled erosion guarantees your roof receives consistent protection without harmful chemicals or frequent maintenance.
Benefits of Choosing Copper Tape Over Chemical Solutions
Choosing copper tape instead of chemical treatments offers several compelling advantages for roof protection.
Unlike harsh chemical solutions that require frequent reapplication and pose environmental risks, copper tape provides continuous, natural protection through its ion-releasing properties. You’ll benefit from a one-time installation that lasts for decades, eliminating the need for regular chemical treatments and their associated costs.
As one of the most eco-friendly alternatives available, copper tape won’t harm your garden, pets, or local wildlife.
You don’t need to worry about chemical safety protocols or protective equipment during installation. The tape’s natural oxidation process creates a self-sustaining protective barrier that works harmoniously with the environment, while chemical solutions can leach into soil and groundwater.
Additionally, copper tape’s effectiveness actually improves over time as it develops its protective patina.
Step-by-Step Installation Guide for Anti-Moss Copper Tape
 Installing anti-moss copper tape requires four essential preparation steps before you begin the actual application process.
First, verify your roof’s surface is completely clean and dry, removing any existing moss, debris, or loose materials.
Second, check the weather forecast – you’ll need at least 48 hours of dry conditions and temperatures above 5°C for ideal installation.
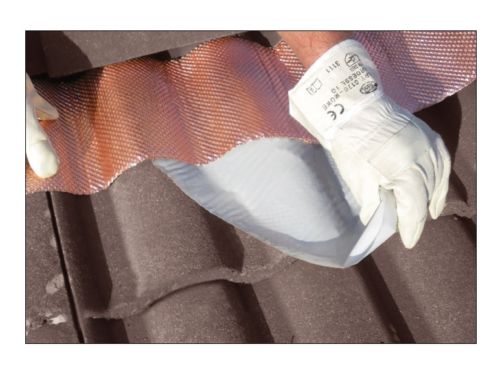
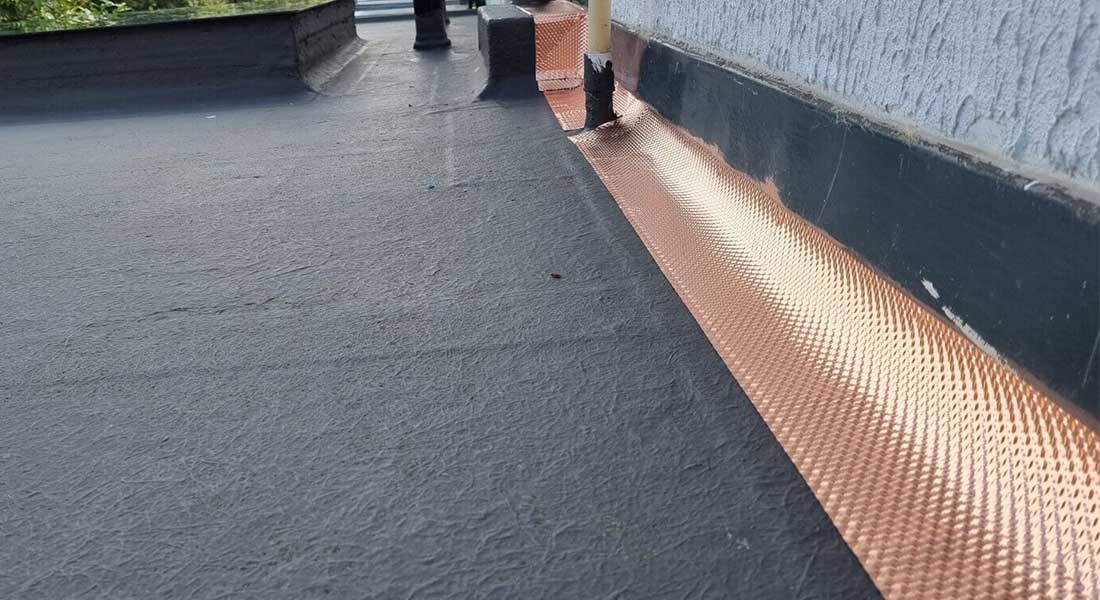
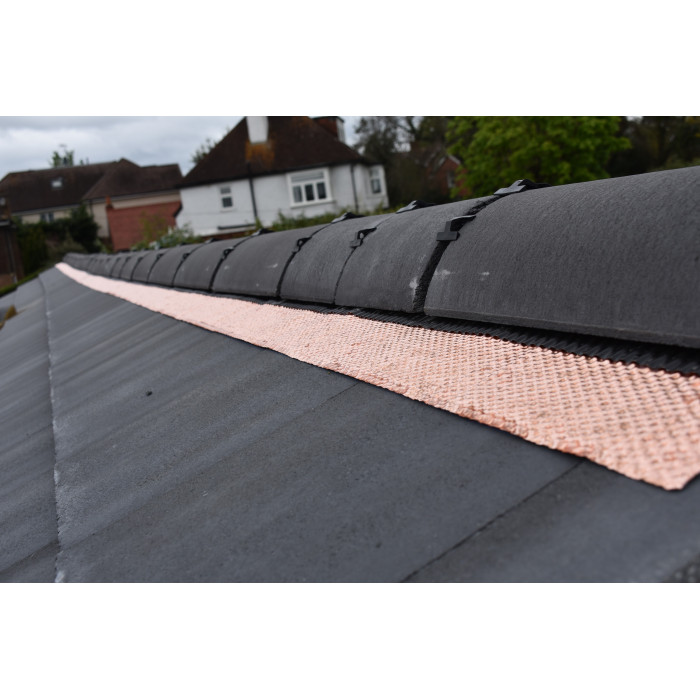
Third, measure and plan your tape placement, positioning it just below the ridge line where water flow is consistent.
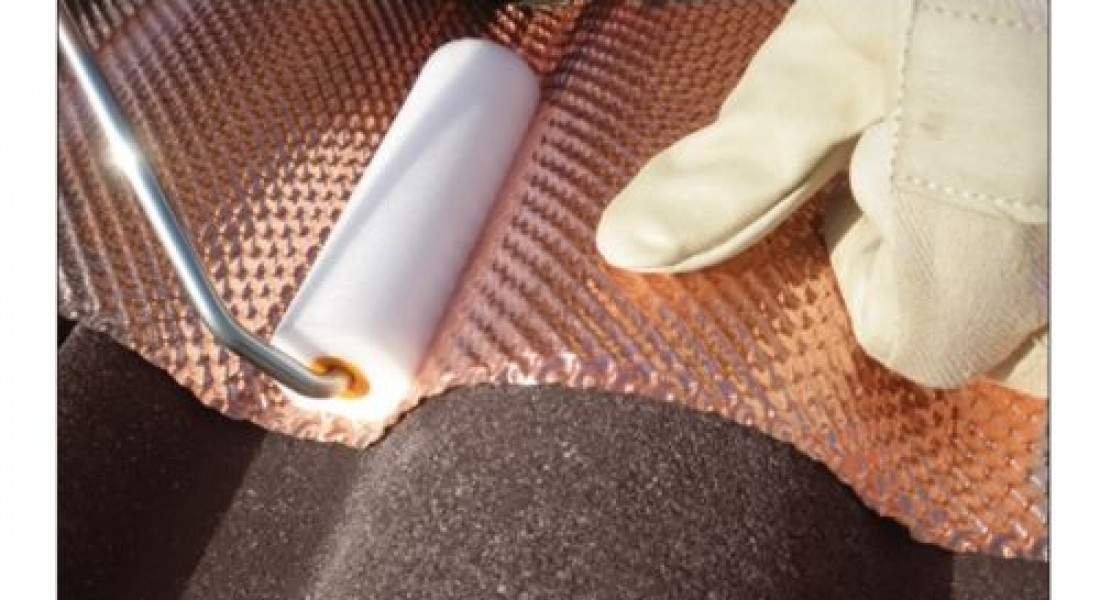
Fourth, gather your tools: a roller, utility knife, and safety equipment.
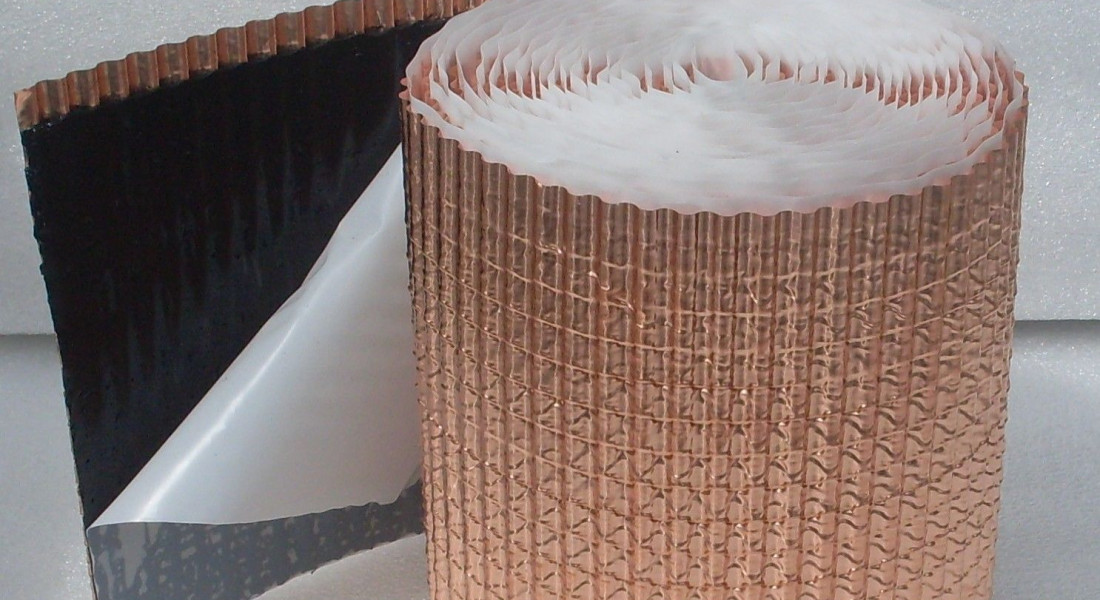
For maximum product durability, here are key installation tips: remove the protective backing gradually as you work, press firmly to activate the butyl adhesive, and use your roller to eliminate any air bubbles.
Work in sections, overlapping edges by 2-3cm to guarantee complete coverage.
Best Practices for Copper Tape Placement and Maintenance
Proper placement and ongoing maintenance of anti-moss copper tape will determine its long-term effectiveness after installation.
To maximize copper tape longevity, position strips approximately 6-8 inches below the roof ridge where water flow is most consistent. You’ll want to guarantee the tape doesn’t interfere with natural drainage patterns.
Check your copper tape annually for any signs of lifting or damage, particularly after severe weather events.
While the tape’s environmental impact is minimal, you can enhance its performance by keeping your gutters clean and removing any large debris that might block the natural flow of copper ions across your roof’s surface.
If you notice any sections becoming loose, don’t wait – address these areas promptly by cleaning the surface and reapplying new tape to maintain continuous protection against moss growth.
Common Mistakes to Avoid When Installing Copper Tape
While anti-moss copper tape offers excellent protection, several significant installation mistakes can compromise its effectiveness. To guarantee ideal performance, you’ll need to avoid common installation pitfalls and follow proper adhesive tips.
| Mistake to Avoid | Solution |
|---|---|
| Installing in cold weather | Apply tape when temperature is above 5°C |
| Dirty surface application | Clean and dry surface thoroughly |
| Incorrect ridge placement | Install below ridge, not directly on top |
| Poor pressure application | Use roller for complete adhesion |
| Overlapping gaps | Make sure strips connect without spaces |
Remember that proper surface preparation is vital for lasting adhesion. Don’t rush the installation process, as improper application can lead to tape separation and reduced effectiveness. You’ll also want to avoid stretching the tape during installation, as this can weaken the adhesive bond and create potential failure points.
Cost Analysis: Long-Term Savings With Copper Tape Protection
Although the initial cost of anti-moss copper tape may seem higher than traditional moss treatments, you’ll experience significant long-term savings through reduced maintenance and prevention of structural damage.
When comparing costs, you’ll find that chemical treatments require repeated applications every 1-2 years, while copper tape protection lasts for decades.
A cost comparison reveals that installing copper tape typically ranges from £8-12 per meter, including installation costs.
While chemical treatments might cost £4-6 per application, you’ll need to reapply them 20-30 times over the same period that one copper tape installation remains effective.
Plus, you’ll avoid expensive repairs from moss-related damage, which can cost thousands to fix.
The one-time installation of copper tape proves to be the most cost-effective solution for long-term roof protection.
Real-World Results: Success Stories From Homeowners
 Homeowners across the UK have reported remarkable success after installing Homemerce’s anti-moss copper tape on their roofs.
Have just purchased and installed the anti moss roll.
What a fantastic product. I wish I had known about it prior to years of damage during the winter caused by the moss freezing and then cracking tiles. we’ve ended up replacing the tiles so this will be a fresh start.
I’ll get my money back after the first year as the cost was as much as the annual cleaning and replacing broken tiles, etc.
So easy to install. The neighbours are very interested and looking to do there roofs as we live in an area subject to a lot of moss growing.
Well done Homemerce. David Skilleter
Our homeowner testimonials consistently highlight two key benefits: the tape’s immediate impact on stopping new moss growth and its long-lasting protection.
A Leeds resident documented how their 15-year moss problem disappeared within one season, while a coastal property owner in Brighton reported their roof has remained moss-free for five years since installation.
These real-world results prove the tape’s effectiveness across diverse environments – from rain-heavy Scotland to humid coastal areas, delivering consistent performance that protects your roof’s integrity year after year.
Frequently Asked Questions
Can Copper Tape Be Installed on Metal or Synthetic Roofing Materials?
You’ll need to be cautious with copper tape compatibility on metal roofs, as it can cause galvanic corrosion. For synthetic roofing materials, guarantee proper adhesion by thoroughly cleaning the surface before installation.
Will Copper Tape Change the Color of My Roof Tiles?
Like a knight’s shield tarnishing, your copper tape will naturally patina to green-blue, but it won’t stain your roof tiles. The copper’s effectiveness for moss prevention remains strong while maintaining your roof’s original appearance.
Does Extreme Heat or Freezing Weather Affect the Tape’s Adhesion?
Your tape’s longevity won’t be compromised by extreme temperatures. The butyl adhesive maintains its weather resistance in both hot and cold conditions, though you’ll want to install it when it’s above 5°C for best results.
Can I Paint Over the Copper Tape After Installation?
You’d defeat the whole purpose if you paint over copper tape – it needs exposure to work! The copper ions can’t release through paint. Save your painting skills for other home projects that won’t compromise moss prevention.
How Do I Remove Copper Tape if Needed Without Damaging Roof Tiles?
For safe removal, warm the tape with a heat gun on low setting, then slowly peel it back. You’ll need to clean any residual adhesive with mineral spirits. These removal techniques guarantee your roof maintenance won’t damage tiles.
Conclusion
Anti-moss copper tape transforms your roof into an impenetrable fortress against invasive growth. You’ll appreciate how this natural solution works tirelessly for decades, saving you thousands in potential repair costs while protecting the environment. When you install it correctly, following the guidelines we’ve discussed, you’re choosing a proven solution that’s outlasted countless chemical treatments. Make the switch today and give your roof the lasting protection it deserves.


27 Responses
hello!,I really like your writing very so much! proportion we keep up a correspondence more approximately your post on AOL? I need an expert in this space to resolve my problem. Maybe that’s you! Looking ahead to look you.
Hey, so on my metal roof I notice this year that my rain barrel water is completely dark green. The EC is still super low, but it does turn my perlite in the hothouse as well as the inside, and outside, of the grow bags to develop moss and turn green and slimy. Can I like glue a row a copper pennies along the roof peak? I get it would be more time consuming, but that’s ok if it would serve the same purpose as the tape. Thanks
I cling on to listening to the news update lecture about receiving boundless online grant applications so I have been looking around for the most excellent site to get one. Could you tell me please, where could i get some?
I don’t think the title of your article matches the content lol. Just kidding, mainly because I had some doubts after reading the article.
Thanks for sharing excellent informations. Your web-site is so cool. I am impressed by the details that you have on this site. It reveals how nicely you perceive this subject. Bookmarked this web page, will come back for more articles. You, my friend, ROCK! I found just the information I already searched everywhere and simply could not come across. What an ideal website.
Your article helped me a lot, is there any more related content? Thanks!
Your article helped me a lot, is there any more related content? Thanks!
Can you be more specific about the content of your article? After reading it, I still have some doubts. Hope you can help me.
Some truly nice stuff on this internet site, I enjoy it.
Great write-up, I’m normal visitor of one’s site, maintain up the excellent operate, and It is going to be a regular visitor for a lengthy time.
**mitolyn reviews**
Mitolyn is a carefully developed, plant-based formula created to help support metabolic efficiency and encourage healthy, lasting weight management.
Your article helped me a lot, is there any more related content? Thanks! https://www.binance.com/bn/register?ref=WTOZ531Y
**aqua sculpt**
aquasculpt is a premium metabolism-support supplement thoughtfully developed to help promote efficient fat utilization and steadier daily energy.
**prodentim**
ProDentim is a distinctive oral-care formula that pairs targeted probiotics with plant-based ingredients to encourage strong teeth, comfortable gums, and reliably fresh breath
**men balance**
MEN Balance Pro is a high-quality dietary supplement developed with research-informed support to help men maintain healthy prostate function.
**backbiome**
Mitolyn is a carefully developed, plant-based formula created to help support metabolic efficiency and encourage healthy, lasting weight management.
Can you be more specific about the content of your article? After reading it, I still have some doubts. Hope you can help me. https://accounts.binance.info/hu/register-person?ref=IQY5TET4
I don’t think the title of your article matches the content lol. Just kidding, mainly because I had some doubts after reading the article.
Your point of view caught my eye and was very interesting. Thanks. I have a question for you.
Thanks for sharing. I read many of your blog posts, cool, your blog is very good.
Thanks for sharing. I read many of your blog posts, cool, your blog is very good. https://accounts.binance.com/vi/register?ref=MFN0EVO1
Your point of view caught my eye and was very interesting. Thanks. I have a question for you.
I don’t think the title of your article matches the content lol. Just kidding, mainly because I had some doubts after reading the article. https://www.binance.com/pl/register?ref=UM6SMJM3
Your point of view caught my eye and was very interesting. Thanks. I have a question for you.
Your point of view caught my eye and was very interesting. Thanks. I have a question for you. https://accounts.binance.com/register-person?ref=IHJUI7TF
**purdentix**
PurDentix is a revolutionary oral health supplement designed to support strong teeth and healthy gums. It tackles a wide range of dental concerns
Your point of view caught my eye and was very interesting. Thanks. I have a question for you. https://www.binance.com/register?ref=QCGZMHR6